
Settings & Configuration Reference
Every configuration screen in MODALIZER+ V7, explained
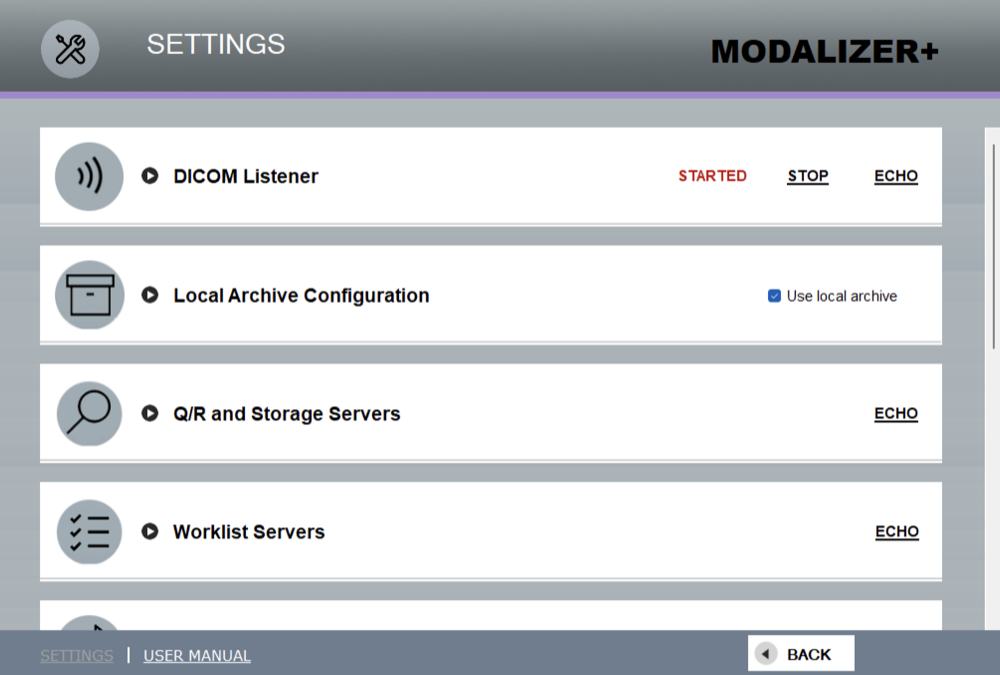
Open the Settings screen from the “Settings” link in the main menu, or the “Settings” button at the bottom left of any screen. From here you configure the DICOM Listener, Storage and Worklist servers, the Local Archive, Formatted Report templates, Custom Actions, DICOM attribute overrides, ECG display, and more.
For two DICOM nodes – workstations, PACS systems – to communicate, each must know the other’s AE Title, IP address (or hostname), and IP port. Once these are set, you can use Storage, Modality Worklist, and Query/Retrieve.
Secure DICOM Networking with TLS
Certificates from the Windows certificate store secure DICOM connections to the PACS – both the Local Machine and Current User stores are supported (managed via Microsoft Management Console). See the Listener and Storage/Worklist Server sections below for where certificates are selected for each connection.
DICOM Listener Configuration
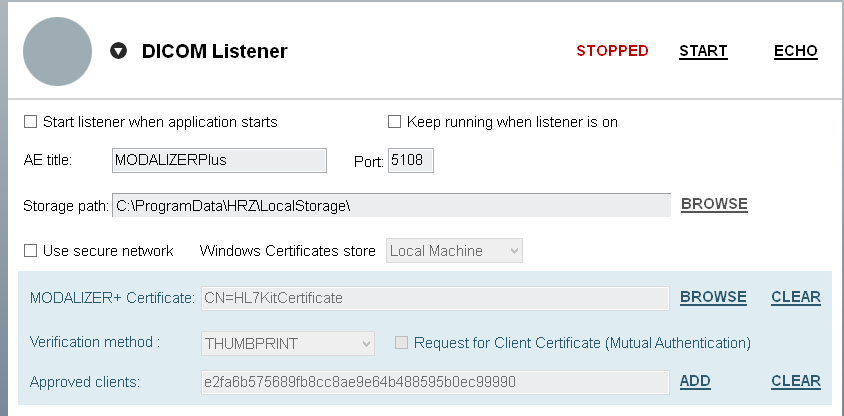
MODALIZER+ can receive DICOM files sent from other applications once its built-in DICOM Listener is started; its current status shows in the upper right of the Listener tab. Set the listener’s AE Title and port, then start or stop it with the button next to the status label. Click Browse to change where received files are stored – this is disabled when “Use local archive” is checked on the Local Archive tab, since the archive folder is used automatically and every received file is registered in the database.
Check “Start listener when application starts” to auto-start it on launch, and “Keep running when listener is on” to minimize MODALIZER+ to the system tray on close rather than exiting – right-click the tray icon to reopen or exit. If an instance is already running, subsequent launches open in “Viewer only” mode; check the tray for an existing instance if this happens unexpectedly.
- Use secure network – enables the DICOM TLS network security layer.
- Windows Certificate store – choose Local Machine or Current User.
- MODALIZER+ Certificate – browse the Windows store for the certificate that identifies MODALIZER+ (must include a private key). Click Clear to remove it.
- Certificate Verification – when checked, the listener requires clients to present a certificate.
- Request for Client Certificate (Mutual Authentication) – controls whether connecting clients must identify themselves.
- Approved clients – the list of client certificates the listener will accept; import client certificates into the Windows store via Microsoft Management Console first, then click Add to select them here.
Local Archive Configuration
Every converted or retrieved DICOM file can be stored in a hierarchical structure (Root folder / Study folder / Series folder / DICOM files), indexed in a built-in SQLite database. Check “Use local archive” on the Local Archive Configuration tab to enable it, and click Browse to change the root storage folder.
Set an automatic clean-up policy from the “Automatically delete local copy of study after” and “…only if” lists. If you switch storage folders, click Rebuild from files to re-scan a folder and re-populate the database – progress is shown live and can be cancelled, and the operation writes a RebuildFromFiles.log listing every folder scanned, every file opened, and every study added by Study Instance UID. Use Import files to pull DICOM files from any folder into the archive on demand.
Storage Servers Configuration
Configure at least one Storage Server to send studies to a PACS or retrieve them with Query/Retrieve.
- Local AE – this installation’s DICOM AE Title; must match the AE Title configured for MODALIZER+ on the PACS.
- Local port – the port MODALIZER+ listens on for incoming connections (default 5108).
- Timeout – keep the default unless you have known connection issues.
Click Add new to define a server: enter its connection details and click Echo to verify. A red X means the settings or server availability need checking – the log is written to lastEcho.log in the MODALIZER+ installation folder (C:\MODALIZERPLUS). Click Save to apply, or Cancel to discard.
- Retrieve method – choose C-MOVE or C-GET for retrieving instances.
- Local AE Certificate (optional) – identifies MODALIZER+ to the remote AE if it requests mutual authentication.
- Remote AE Certificate (optional) – if left blank, MODALIZER+ won’t explicitly verify the server certificate. Verify Certificate (enabled only when this is blank) makes MODALIZER+ look for the remote certificate in the local user store instead.
You’ll also need to configure your PACS with MODALIZER+’s AE Title, hostname/IP, and port – ask your PACS administrator for these parameters if you’re not the one managing the server.
Worklist Servers Configuration
A Worklist Server must be configured before you can use Modality Worklist queries.
Set the connection parameters and click Echo to verify – a red X means the settings or server need checking. Click Save to apply. Timeout should stay at the default unless you have known connection problems.
- Filter results to studies scheduled for “today” and/or a specific Scheduled AE Title, via the checkboxes in the Worklist Server panel.
- Two step verification (checked by default) – shows the received Modality Worklist data in a confirmation dialog before starting the procedure.
- Automatic MPPS – sends an MPPS update when the study completes. Don’t enable this if your Worklist Server doesn’t support MPPS.
- Storage server – the default remote server for studies created from this Worklist entry.
Remote server and certificate/security settings work the same way as Storage Servers, above. Ask your System Administrator for the Worklist Server parameters if needed.
External Acquisition Application (EXAP) Configuration
You can hand off image acquisition to an external application – for example, software that receives images directly from a CT or other modality device. That application must accept, as an input parameter, the path to an “exchange data” file containing patient data, and save its acquired files in that file’s parent folder.
- Path to executable – the EXE that starts the external application (by default, a working built-in example that mirrors the standard Acquisition screen). Click Browse to change it, or “Reset to built-in” to revert.
- Shared folder – where the exchange file (XML, TXT, JSON, etc.) is written.
Check Use EXAP to enable it – the external application then launches whenever you click Next on New Patient or Modality Worklist, or when adding a new series from Local Archive or Query Retrieve. MODALIZER+ fills the exchange file with case attributes (patient name, ID, birth date, sex, study info, etc.) using the same $placeholder$ syntax as Formatted Report Templates. The template file, PatientDataTemplate.xml in the installation folder, can be any text format; by default it’s an XML file listing every available field. Output is written as PatientData.xml in the shared folder for your EXAP application to read. After you add files and click Done (or the external application closes), the Acquisition screen reopens with the acquired files added.
Formatted Report Template Configuration
See the Reporting chapter for how templates fill case data automatically. Select a template in the list and click Edit to change its display name, swap the underlying RTF file, or open the RTF itself to edit its header/footer, text, and logo. Click Add new to register a custom RTF file as a new template, or select an existing one and click Delete to remove it – at least one template must always remain.
Custom Actions Configuration
A Custom Action runs an operation using data from a selected Modality Worklist or Query/Retrieve entry.
Click Add new to create one: choose which screen it appears on (Modality Worklist or Query Retrieve), give it a title for the list, and point it at a command file – a .TXT, .RTF, .EXE, or .BAT. Check Replace parameters to have MODALIZER+ substitute placeholders in the command file with data from the selected MWL/Query entry, the same way Formatted Reports work. Selecting the action from its row on the MWL/Query screen opens the (parameter-substituted) file as a separate process. Edit or delete existing actions from the list, and use Test to try one out with randomized sample data.
Three ways to use a Custom Action:
- Start an EXE with no parameters.
- Open a document template (TXT, RTF, etc.) containing placeholders like
$PatientID$– the filled file is saved to[MyDocuments]\MODALIZERPLUS\ACTIONSand opened as its own process (Notepad, Word, etc.). - Start an EXE with parameters – create a batch file (e.g.
MyCustomAction.bat) containingC:\MyFolder\EXE.exe $PatientID$ $PatientName$, select it as the custom action, and check “Replace parameters”.
Available parameters: $PatientName$, $PatientID$, $PatientSex$, $PatientBirthdate$, $StudyDate$, $AccessionNumber$, $StudyTime$, $Modality$, $RequestedProcedureDescription$, $ScheduledProcedureStepDescription$, $StationName$, $ReferringPhysiciansName$.
DICOM Templates – Overriding DICOM Attributes
DICOM attribute templates are editable/replaceable files. Check “Use Template” to apply the attributes they define. You can define one “Common” template applied to every converted file, plus separate Image, PDF, Video, and Structured Report templates applied only to their matching file type – each can be created or selected independently.
Important: override attributes are applied after every other conversion step, so avoid overriding image-related attributes (group 0028).
To create a template, click New, choose a file location and name, and click Save – it loads automatically so you can edit its attributes. Start typing an attribute name for autocomplete suggestions, or search by tag number. Click Add to insert it into the table, then set its value; click the “X” to remove an attribute. Click Browse to switch to a different existing template file.
ECG Display Settings
Configure how the built-in 12-lead ECG viewer renders waveform graphs – see the DICOM Viewer Guide for how to open and use these settings from the Viewer itself.
Miscellaneous Configuration
File System Directory Organization
Enable “Create new folder for every run” (recommended) to store each study in its own newly created directory. When the Local Archive is disabled, the destination folder for converted images can be set manually instead (see the New Patient workflow).
Unicode Character Set Support
When “Use unicode character set” is checked, string-type tag values (VR types SH, LO, ST, LT, UT, PN) are inserted as Unicode. If your Windows system setting “Use Unicode UTF-8 for worldwide language support” is on, MODALIZER+ encodes strings as UTF-8 and sets the “ISO_IR 192” DICOM character set in tag (0008,0005) regardless of this checkbox.
Per-User Configuration
When enabled, every Windows user account gets its own separate MODALIZER+ configuration file.
Capture Key
Bind a key combination to trigger image capture from the current TWAIN/WIA device while on the capture screen – click inside the “capture key” box and hold the combination you want to use (modifier keys plus a character, e.g. Ctrl-A, Alt-Z, Ctrl-Shift-F, or a function key). Enter/Return and Space aren’t recommended, since they can interfere with standard UI navigation. Click the box and press Delete to clear the binding.
DICOM Log Level
Controls the verbosity of log output for operations like Send ECHO and Get Query; the default is “INFO”.
← Previous: Reporting | Next: How-To Guides →
DICOM is the registered trademark of the National Electrical Manufacturers Association for its standards publications relating to digital communications of medical information.